Coding in Windows - Setting Up Git & Cmder
14th January 2015If you're going to be getting into coding, especially Front End, Node.js, or Angular.js development, you're likely going to need (or want) to use Github and version control in your workflow. In this article I'm going to go over how to set up Github for your Windows system, and how to get it to work with the excellent console emulator, Cmder.
Until you start using it, you never really learn how awesome version controlling your projects can be. Without version control, you're working with static files in a generally fixed location, and if you want to back up your project at a certain point in time, you have to manually create a copy of your project and store that somewhere. When you work in teams, this can quickly become convoluted and difficult to manage. With version control, you can automate the process a bit more, and you gain the flexibility to be able to work in multiple locations and with other developers without needing to transfer files over email, thumbdrives, or ftp.
If you'd like to learn more about the history of Version Control, I encourage you to check out the Git Documentation Chapter, Getting Started - About Version Control.
Setting Up Git
Step 1: Download and Launch the Git Installer
Navigate to https://git-for-windows.github.io/ and click "Download" to download Git for Windows. This will send you to the latest compiled executable hosted on Github. When I wrote this blog post this downloaded Git-1.9.5_preview20141217.exe, which is the version I wrote this post using. Please keep this in mind in case there are any issues. Once this file is downloaded, launch this file.
Step 2: Complete the Git Setup
- After you run the installer, the Git Setup window will appear. Click "Next >" to get started.
- On the Information page you'll be presented with the program's GPL License text. Click "Next >" to continue.
- On the Select Components page you can leave the Additional icons options unchecked and every other option set as their default. Click "Next >" to continue.
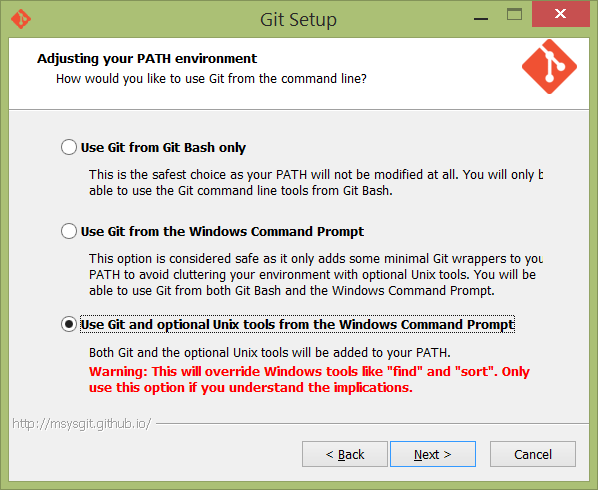
- On the Adjusting your PATH environment page you're presented with three choices. What this page is really offering you:
- Use Git from Git Bash only -- If you choose this option, you'll only be able to use the
gitcommand, and other unix tools, by launching a shortcut to the Git Bash client. You will not be able to use this commands from the Windows Command Prompt. - Use Git from the Windows Command Prompt -- If you choose this option, you'll be able to use ONLY the
gitcommand from the Windows Command Prompt. The rest of the unix tools will only be able to be run by launching a shortcut to the Git Bash client. - Use Git and optional Unix tools from the Windows Command Prompt [My Personal Recommendation] -- If you choose this option, you'll be able to use the
gitcommand from the Windows Command Prompt AS WELL AS all the extra unix tools such asls,pwd, andssh-keygenfrom the Windows Command Prompt. Yes, this does replace some Windows-based tools, such asfindwith the unix version, but unless you're creating python scripts or batch scripts to manage Windows in some fashion, you can get away with this option with little to no issue. When you have made your decision, click "Next >"
- Use Git from Git Bash only -- If you choose this option, you'll only be able to use the
- On the Configuring the line ending conversions page, you're presented with three more options. What I would recommend is instead of letting Git manage line ending conversions for you, you instead manage your files line endings from within your IDE. In a future article I may go over how to set up line endings in Sublime Text which is my preferred of handling line endings. With this in mind, I recommend you select Checkout as-is, commit as-is as we will manage line endings ourselves. Click "Next >" to commit to the install.
You should now have Git installed, and you can technically stop reading this part of the tutorial as you have all the functionality to use Git. But for Quality of Life reasons, I recommend that you continue reading, and follow the instructions for setting up Cmder. The Windows Command Prompt doesn't make copying and pasting as easy as the terminal does in Linux or Mac, and Cmder fixes that issue while adding some additional features and visual enhancements.
Setting up Cmder
Step 1: Download and Extract Cmder Mini
Navigate to http://bliker.github.io/cmder/ and scroll down to the Download section. Click "Download mini" to download a zip file for Cmder. Once the cmder_mini.zip file has finished downloading, extract the contents to a location of your choosing. I recommend that you extract the contents to C:\cmder\.
Step 2: Set up Cmder to launch Git Bash
- Navigate to C:\cmder on your hard drive and launch Cmder.exe.
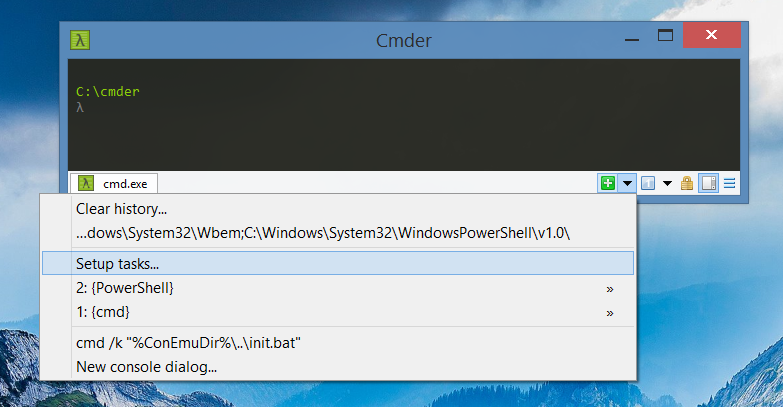
- In the bottom tab bar area of Cmder, you'll see a green '+' button, click the dropdown next to that green button and click "Setup Tasks..."
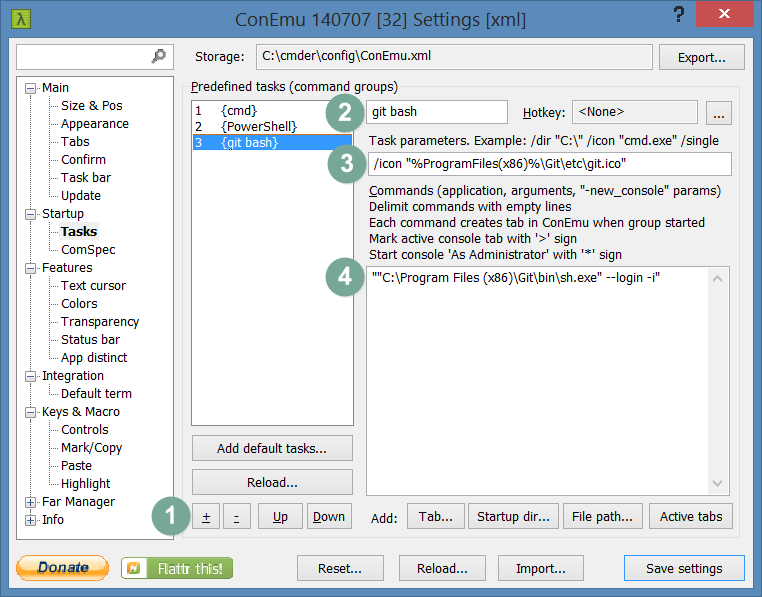
- You should now be presented with an options page which will let you edit the Startup > Tasks options. We have 4 things to do here to add our Git Bash installation to Cmder.
- Under the "Reload..." button, click the "+" (add) button. This will add a new blank task.
- Enter a name for your task. Let's name it
git bash - Set the icon for this task to Git's icon by typing in the Task Parameters field,
/icon "%ProgramFiles(x86)%\Git\etc\git.ico" - Now all we need to do to finish creating this task is add the command to launch Git Bash. Depending on how you set up Git earlier when choosing how to adjust your PATH environment...
- If you selected either Use Git from Git Bash only or Use Git from the Windows Command Prompt, you will want to type in the following command:
""C:\Program Files (x86)\Git\bin\sh.exe" --login -i" - If you selected the third option, Use Git and optional Unix tools from the Windows Command Prompt, you can type in the following command:
"sh --login -i"
- If you selected either Use Git from Git Bash only or Use Git from the Windows Command Prompt, you will want to type in the following command:
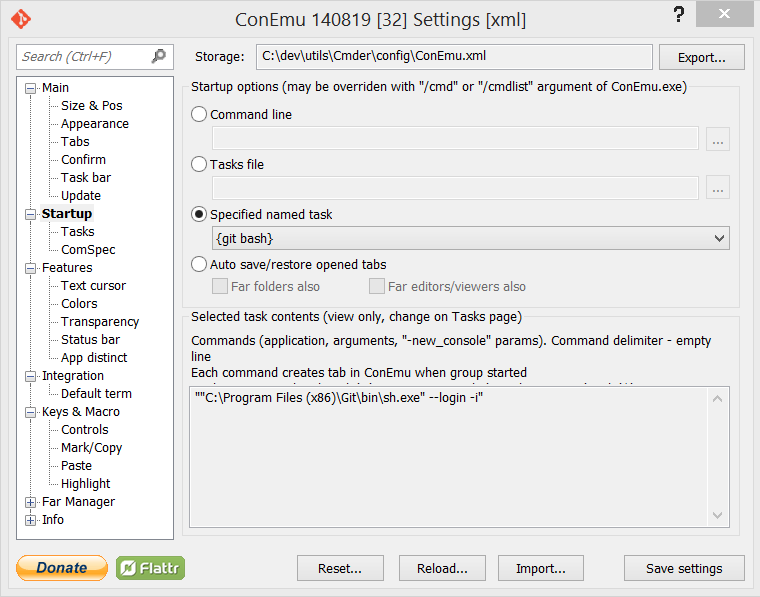
- Now before you click "Save settings," let's go ahead and click on the "Startup" option in the left options menu (the parent to Tasks). We're going to select the radio option, "Specified named task" and select {git bash}.
- Now we can click "Save settings" (unless you want to go through the rest of the options and change font size and other behaviors). Every time you open Cmder, it will automatically run Git Bash by default, and you will have access to all the neat unix tools that Windows doesn't provide, in a clean, easily resizable, and fully customizable console!
At this time you may want to create shortcuts for Cmder on your taskbar, desktop, or start menu. You can do this by navigating back to C:\cmder and right-clicking on the Cmder.exe file, where you have an option to "Pin to Start," "Pin to Taskbar," and/or "Send to" > "Desktop (Create Shortcut)."
If you have any comments or questions about this article, or are interested in me writing an article about another topic or issue you are curious about or needing help with, feel free to shoot me an email: and...@awmoore.com

Not your typical IT guy – a unicorn if you will – with a love for the outdoors, technology, security, and keeping end-users happy (and in line). INTP.
View Comments